You are here: Home | Slabs | Italian Porcelain |
AGATA BLUE
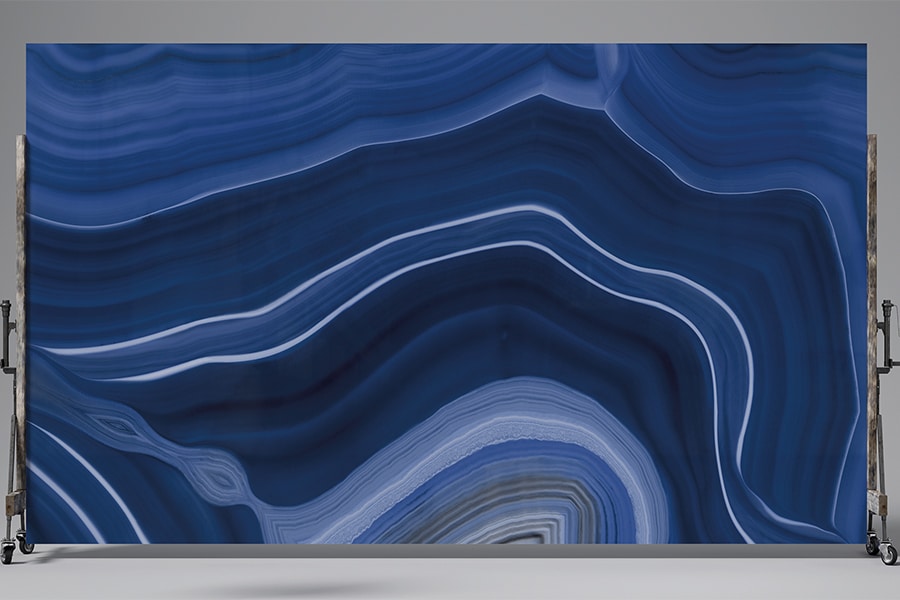
Agata Blue is part of the Italian Porcelain large format slabs collection made of thin slabs that replicate the beauty of natural stone: Marble, Onyx, Quartzite, and Terrazzo. These slabs are durable and versatile.
Usage: Commercial & residential, interior, exterior, vertical, horizontal & water applications.
Pictures shown are representations ONLY. Sizes are approximate & may vary slightly with each order. Stock LA Warehouse.
INSTALLATION IMAGES BELOW↓
| AVAILABILITY | TYPE | NOMINAL SIZE | THICKNESS | FINISH |
|---|---|---|---|---|
| Stock | Slab | 63-1/2" x 127" | 12 mm | Polished |
- Exterior Cladding:
- Exterior Pavers:
- Interior Walls: Yes
- Interior Floors: Yes
- Kitchen Countertops: Yes
- Other Countertops: Yes
- Wet Areas:
- Traffic: Interior & Exterior applications.
***ALWAYS USE A LICENSED INSTALLER ***
STORAGE & INSPECTION OF PRODUCT
Open and inspect each box of porcelain tiles upon receipt of tile and before installation to confirm shading consistency. If tile will not be installed right away, make sure that is stored indoors, away from rain, sun or extreme temperatures. Do not stack porcelain boxes high, as they can be damaged by weight. Rock Mill Tile & Stone does not accept claims after product has been installed. Slight variation in shade and color tone is expected. If required, blend pieces from different boxes to ensure a random shading placement during installation.
SUBSTRATE PREPARATION
The surface upon which mosaics will be installed should be clean, solid, even and without cracks. Installation should not be started until substrate meets these conditions because the imperfections will be magnified once tile has been installed. It must be secure and free from any contamination that can act as a bond breaker or bond inhibitor. If there is any substance present that could inhibit the bond of the mortar, remove it completely. Suitable substrates include, but are not limited to, cement backer board, concrete, mortar beds, cement plaster, and existing ceramic tile/stone. Refer to industry information for a complete list of approved substrates. The surface should have a max variation of less than ¼” over a 10’ area. For vertical surfaces, wall should be plum. Use a leveling mortar if necessary to even out the low areas of the surface. Allow to cure 24-72 hours and follow adhesive manufacturer’s guidelines for specific adhesive requirements.
MORTAR / LAYING THE PORCELAIN TILE
Rock Mill Tile & Stone strongly recommends hiring a licensed tile contractor for all tile installation. Depending on the application and conditions present, the use of a liquid-latex fortified sanded cement mortar, Polymer modified sanded cement, medium bed, or epoxy mortar is recommended for the installation of porcelain tile. It can also be set in a mortar bed (thicker bed). Consult the mortar materials manufacturer for additional information and installation instructions. Using a small notched trowel apply adhesive in a smooth and uniform direction. The size of notch depends on tile size and installation location. Tiles should be placed upon adhesive while it is still fresh and pressure should be applied until there is full adhesion. Keep tiles level with each other by applying uniform pressure to each tile as it is placed. A rubber float may be used to pound the tile to achieve a more even level across the surface. Continue to install the remaining tiles, taking care to line up grout joints and ensure a level surface. Use spacers between tiles, as necessary to ensure consistent joint spacing. Allow to dry completely.
APPLYING THE GROUT
Wait until adhesive has dried completely before applying grout. While grout-staining problems are rare when using quality porcelain, a small test patch is recommended when using a contrasting grout to tile look (ie; dark grout over a light-colored tile). A grout release product is recommended prior to grouting, if there is an issue with the grout color staining the tile. The test patch will also verify cleanability of the grout with heavily textured tile surfaces. It is essential that each tile be back-buttered and fully bedded for firm support. DO NOT ALLOW GROUT TO DRY on tile surface. Grout haze can be reduced or prevented after grouting by immediately cleaning the surface using a wet, soft sponge (with CLEAN, hot water) to avoid scratching the tile surface. A diluted concentrate of a PH-neutral cleaner can be used if necessary. Dry with a soft dry cloth.
FLOOR PROTECTION & CLEANING PROCEDURES
If other construction is occurring onsite, protect the entire floor with thick paper, cardboard or plastic until all construction is finished. Be careful with use of tape, including painter’s blue tape on surface of tile, because it may leave sticky residue when removed.
For further installation instructions, please refer to the Tile Council of North America.
http://www.tcnatile.com/
Please inspect ALL material upon receipt. Claims will not be honored after installation. Rock Mill considers the actions of the installer/contractor/3rd party that customer authorizes to pick up the material to be the responsibility of the customer.
Rock Mill will not honor claims made by the customer, due to unauthorized or improper installation by customer’s installer/contractor. Please ensure that a sufficient quantity of stone is initially ordered to complete the job.
Add-on orders purchased later may vary slightly as new batches may come from different parts of the quarry and will not be guaranteed to match the original order.
All items that are stocked are located at the Rock Mill Gardena, California warehouse.
For more information, please contact your Rock Mill rep. Thank you!
Thickness: ± 0.5% / ± 0.5 mm
Flatness: ± 0.5% / ± 2.0 mm
Stain Resistance: 5
Breaking Strength: ≥1,300 N
Flexural Strength: >35 MPa
Modulus of Rupture: ≥35 N/mm²
Impact Resistance: 0.85
Linear Thermal-expansion: ≤9x10⁻⁶ °C-1
Apparent Density: 2,500 Kg/m³
Deep Abrasion: 24-27 mm
Water Absorption: ≤0.1%
Frost Resistance: No change in bending strength after thermal cycle