You are here: Home | Terracotta and Ceramic | Ceramic | Spanish Brisa©

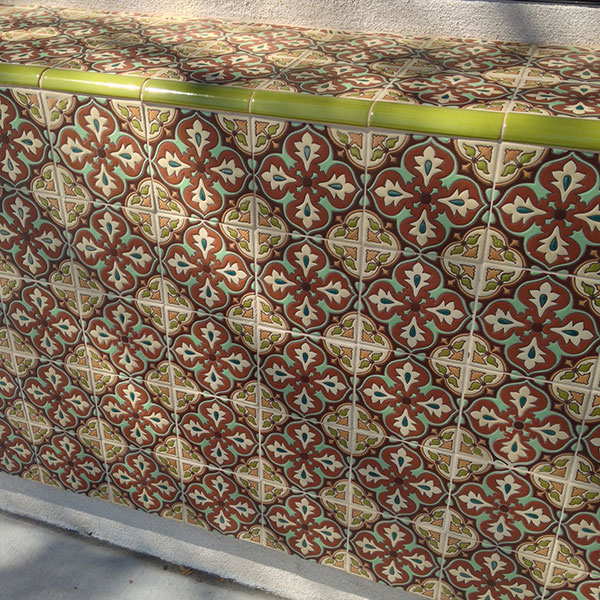
Spanish Brisa© was created and copyrighted by Rock Mill. The hand-painted collection comprises ten ceramic tiles. Each design is offered in two complimentary colorways. Additional options are offered with the Malibu In-stock collection.

Product Info: Due to the variation of natural pigments used in ceramic glazes & kiln-firing, please expect some color variation, especially between batches. Call for current stock. All patterns can be custom ordered in sizes up to 12x12". Custom sizes are subject to minimum quantity & lead time.

The pictures shown are representations ONLY. Sizes are approximate and may vary slightly with each order. Stock LA Warehouse.

Usage: Commercial & Residential; Interior & Exterior applications.
Walls or light traffic floors. Custom Quarry bisque and acid-resistant
glazes should be used for water applications.

INSTALLATION IMAGES BELOW

TYPE NOMINAL SIZE AVAILABILITY
Ceramic Tile4"x4"Stock
Ceramic Tile6" x 6"Stock
  • Exterior Cladding: Yes
  • Exterior Pavers: Yes
  • Interior Walls: Yes
  • Interior Floors: Yes
  • Wet Areas: Yes
  • Traffic: Commercial & Residential

Spanish Brisa
Ceramic Care & Maintenance

MALIBU CERAMIC & SPANISH BRISA
CARE & MAINTENANCE

SEALING
Apply a high-quality, penetrating sealer, concrete, and grout from damage caused by water, salts, and oil-based stains. Treated, indoor and outdoor surfaces become easier to clean, and maintain and will look better longer.

Due to the nature of the tile surface, it is recommended that the first coat of sealer be applied BEFORE grouting and that the second coat be applied AFTER grout has been allowed to set. The second coat of sealer should be applied after the grout has dried (approx. 3 days) and the tile surface has been thoroughly wiped clean. It is important that sealer be applied according to the manufacturer’s specific instructions. To ensure the proper installation, all materials to be used including thin set, grout, and sealers should be tested on a mockup installation before installing the entire area. Allow 24-hour cure time to determine the ease of application and desired results. (See manufacturer’s specific instructions).

GROUTING
The grout should be a premium-modified grout. Grout installation after a minimum of 24 hours of curing time at 70°F (21°C).

ROUTINE MAINTENANCE
For routine ongoing maintenance of tile, and grout, apply a high-quality tile cleaner.

PROCEDURE:
1. Sweep or vacuum the floor to remove loose surface debris.
2. Add two to three capfuls of cleaning concentrate to a bucket of clean water.
3. Apply to the floor using a mop.
4. Allow to dwell on a manageable area for at least 2-3 minutes.
5. Agitate the surface with a mop, and ring the mop out with clean water.
6. Rinse with clean water, changing rinse water as needed.

Note: A soft to medium scrub brush may be substituted for the surface agitation of a cleaner if needed in high-use areas.

As always, to ensure proper care, all materials to be used including thin set, grout, cleaners and sealers should be tested on a mockup/small installation prior to use on the entire area. Allow 24-hour cure time to determine the ease of application and desired results. (See manufacturer’s specific instructions).

DO NOT use any type of high-concentration acid (like Muriatic Acid) to clean the tiles.

ROUTINE CARE FOR YOUR TILE
Ceramic tile is one of the most durable and maintenance-friendly surfaces you can choose for your walls, floors, countertops, etc. With proper care & minimum maintenance, it will retain its original beauty and luster for many years. Generally, all that is necessary to keep your tile looking as good as new is a quick wipe with a clean damp cloth or mop. Prompt cleanup of spills and regular cleaning will keep your ceramic tile surfaces looking their best.

GENERAL CLEANING
Remember that you should sweep or vacuum floor areas before cleaning with other products. In some cases, regular sweeping may be all that is required for general cleaning as it loosens and removes most dirt and debris. A vacuum cleaner may be used for sweeping, but make sure you use one without a beater bar to avoid dulling and scratching the tiles. Vacuum cleaner attachments are excellent for picking up loose dirt along edges or in between tiles. Glazed tile products should be cleaned routinely with an all-purpose, low VOC household or commercial cleaner. Follow the cleaner manufacturer’s directions. The entire area should be cleaned and scrubbed with a cleaner solution using a cotton mop, cloth, sponge, or non-metallic brush. The entire area should be rinsed with clean water to remove any cleaning solution residue. Routine cleaners should never contain hazardous or polluting products including, but not limited to acids or ammonia. Acids can damage the grout and the glazed surface of the tile, and ammonia can discolor the grout.

MATS
Use doormats to keep dirt from coming into your home, business, or installation, and shake them out often. This will reduce the amount of dirt being tracked across your ceramic tile floor and will reduce the wear to the finished surface.

HEAVY CLEANING
Mild scrubbing with a soft brush or electric polisher/scrubber may be required for textured tiles. Be sure to consult the cleaning product’s instructions to ensure the product is recommended for your type of tile. After cleaning with an all-purpose, low VOC household or commercial cleaner, rinse thoroughly with clean, warm water to remove leftover residue. If necessary, wipe the tile dry with a clean towel to remove any film.

NEW INSTALLATIONS
Immediately after the tile has been properly installed and grouted, the new installation should be covered with brown paper to protect it from debris during the remaining construction process. The grout joints should be dampened daily with clear water using a clean sponge or mop during the first 7 days. This procedure facilitates the grout cure and color lock. The paper will allow for two important things: (1) to protect the newly installed tile grout and (2) to allow moisture to escape from the grout as it cures further protecting the look and utility of the floor. This is an important step in achieving color consistency. Never use plastic or non-absorbent materials to protect freshly installed tiles. These types of non-absorbent products will trap moisture causing the grout to discolor during the curing

THINGS TO REMEMBER
1. Clean up spills as quickly as possible so your grout won’t become stained.
2. Use an all-purpose, low VOC household or commercial cleaner.
3. Don’t use steel wool, scouring powders, or other abrasives that can scratch the finish of your ceramic tile.
4. Remember that while ceramic tiles are very durable, it’s not indestructible and may crack or chip under extreme force.
5. Don’t use bleach/ammonia-based cleaners. These products can discolor grout if used too often.
6. Take the proper precautions when moving heavy objects across a ceramic tile floor.
7. Cover furniture and table legs with protectors to guard the floor against scratching.
8. Remember that if a repair is necessary, the replacement product may have a slightly different dye lot and/or texture than the original tile, however, with time and usage, the replacement tile will blend in with its neighbors.

Please inspect ALL material upon receipt. Claims will not be honored after installation. Rock Mill considers the actions of the installer/contractor/3rd party that customer authorizes to pick up the material to be the responsibility of the customer.

Rock Mill will not honor claims made by the customer, due to unauthorized or improper installation by customer’s installer/contractor. Please ensure that a sufficient quantity of stone is initially ordered to complete the job.

Add-on orders purchased later may vary slightly as new batches may come from different parts of the quarry and will not be guaranteed to match the original order.

All items that are stocked are located at the Rock Mill Gardena, California warehouse.

For more information, please contact your Rock Mill rep. Thank you!

INSTALLATIONS